Showing posts with label creative space. Show all posts

Thursday, 16 February 2012

bedhead to photo display


Hello all!!! 
Finally a blog post I hear you all say!!!
This is a project I did a while back and I am still loving how it turned out.


IMG_2355-1


First I started with the purchase of the bed ends form the op shop for $14.


_MG_0881


We used the head part (the bigger one) for this project.
The inside piece of the headboard is recessed which means we can place a piece of glass into it with no effort.
We  marked and cut off the legs


Picnik collage


Took the hammer to the capping on the top
and gave it a quick sand.
The back of the headboard was now going to be where I stick the photos as it is the smoothest surface.
I then stained the whole thing with my new favourite colour.
Cabot’s Indian Tea


_MG_0922

Then it was just a matter of measuring the headboard and working out the size and amount of photos I would need.
I wanted all the photos square so I went with 4x4 inches and I need 36 photos in total giving me 4 rows of 8.
I just had them printed at Harvey Norman and the girls there are very helpful and showed me how to print the 4x4 size on normal 6x4 prints as this is the cheapest option.


_MG_0988


 I cut all the photos down and used double sided tape to stick them down with.
I had a piece of 4mm glass cut to fit, placed it slowly and carefully on top of the photos.
To hold the glass in we just used some brass brackets that Ewan cut down to fit.


IMG_2360


This baby is quite heavy so some heavy duty wall hanging hooks were needed.


IMG_2344


Once hung, stand back and admire.


IMG_2294-1


IMG_2301


IMG_2359-1


IMG_2299


An unique photo display that I can change up whenever I like.
I am thinking this is great for a theme like
Photos of the person who’s birthday it is that month.
Past Christmas Photos
Family holiday.
I am sure the list is endless.
2AE8706DA2F39A82BDB1510FEE5AF80C
Linking up

Wednesday, 5 October 2011

DIY tripod lamp

Collages-2
_MG_1032

We had this old tripod that couldn’t be used as it was missing a vital part.
_MG_0965

I had thrown it in the bin, but it was bothering me that I had just thrown it away.
There must be a use for it!!!!!!!
So off to the bin I went and reclaimed it.

We also had an old Barbie lamp that didn’t sell at our garage sale, so Ewan smashed  it  open and got the lamp fixture out of it.
_MG_0974

We  pulled the whole top piece of the tripod apart so as Ewan could drill down through the top to place the lamp fixture into it.
_MG_0969

Once we finally had the whole thing straight, we put the tripod back together and placed a new shade on it.

_MG_1015-1

_MG_1017-1

Take a look  here at our creative spaces thanks to kootoyoo
2AE8706DA2F39A82BDB1510FEE5AF80C
also linked to

Thursday, 29 September 2011

simple sewing

:simple sewing:
{part 2}

Another simple sewing project.


No pattern required.


No procrastinating.
Just making.


Actually achieving something.


Turning off the computer so as I am not overwhelmed by all the information out there.


Now dont' get me wrong,  I LOVE the Internet with such places as blogspot and pinterest but.....
I do find I get very distracted and procrastinate for far too long (hours) instead of just turning off the computer and going with my instinct and not thinking that my project could be done bigger and better.
Anyone else out there have the same problem??????
Lots more happening over here

Thursday, 22 September 2011

my creative space

:simple sewing:


:: simple sewing for someone special going on an adventure ::
Many more spaces here 


Thursday, 1 September 2011

screen printing tutorial

:a tutorial:

Now before I start I want to make it very clear that I not by any means an expert in screen printing.  I do not know any of the technical terms and processes. 
This is just a little tutorial on how I do it  and what I have learnt along the way.

 Anyhoo, moving right a long,  let's get started.

NB: For this type of screen printing it is a kind of one off.  By that I mean you can not save the stencil to re use it.

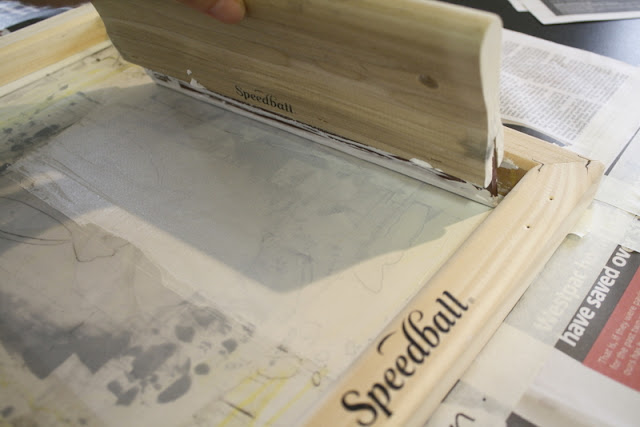
Firstly these are my weapons of choice.


 The Speedball screen and ink are readily available in most art supply shops.
I got my screen from Riot Art and the ink from deans art in the city (Melbourne)

Ok, next you want to make a stencil.  Now for this I just use plain A4 copy paper as I don't print loads of the one image at any one time.  You can get about 10-15 prints out of the paper. Just  keep an eye on it as it becomes quite saturated in ink and may tear.
  There is waxy paper also available from art supply stores that lasts longer enabling many more prints.

If you want a design that is symmetrical,
1. take your paper and fold it in half
2. Draw your design remembering you are only drawing half of it.
3. In my design above you see I have only drawn half of the big petal at the top and the stem
4. Cut out the design with either a little pair of scissor or a craft knife.
I use both depending on what the design is and what feels more comfortable
5. Unfold it and there you have it!!!!

You can always just draw a  design and use a knife to cut it out I like have here

Once you are happy with your design, place in down on some newspaper or scrap paper,
then
1. Make sure you add all your little cut out bits.
2. Carefully place the screen down on top of your design
(I try and line it up as straight as possible with the screen)
3. Check to make sure none of your pieces have moved.
You can see your design through the screen


Are you still with me???????

I hope so because it's now time for the fun part............

Now we are going to load (yes I believe that is a techie term) the screen up.

1. Place some paint at the top of the screen
2. Place your squeegee at the top behind the ink
3. Run the squeegee down the screen carefully trying to stay one the paper area and not the screen.
Now I do this a few times to make sure the screen is loaded.
4. Lift the screen to see your design printed on the newspaper and the paper design stuck to the bottom of the screen.
If the print is a little uneven then repeat this process again making sure to use a clean bit of newspaper each time as you don't want paint where it shouldn't be!
NB: If you do go off the paper design on your screen a little  when you are loading the screen just, tape that area with masking tape so ink doesn't bleed onto your fabric when you are ready to print. Hope that makes sense!

1. Turn your screen over
2. Tape the edges with masking tape to stop any ink bleeding out the sides


Wooohoooo now we are ready to start printing.

1. Place the fabric that you are about to print on, down on some newspaper.
2. Place some ink at the top of the screen and run your squeegee down the screen a couple of times.
3. Lift the screen carefully, and with everything crossed, your design should be printed.
This is when I let out a little scream and do a little happy dance that it has worked


If you need to print your design in a particular spot each time you can tape up a grid (registration lines THANKS Nic) with masking tape like I did here.

Now it's time to sit back and admire your work..


and if you are anything like me and happy that it has actually worked, you will want to print anything you can get your hands on.


Now for all of you lovely ladies that have made it to the end of this post,  how would you like to win the apron that I made and printed???
Well, all you have to do is leave a comment and I will draw the winner on Monday 5th September at 11.00am.
Entry open to everyone.

More creating going on over here

Thursday, 18 August 2011

screen printing

:my creative space:

I've been playing with my screen and ink again.


I bought some plain linen placemats (couldn't be bothered making them, that's for next time)


I cut out my design and placed it on the screen.

I wanted the image to be roughly in the same place on each mat, so I very technically (ha ha, using the word technically very loosely :-)) made a grid using masking tape making sure to label each line. 


 I just laid the placemat on some newspaper and marked the edge with masking tape


 Then I laid the dry screen where I wanted the image to be and marked the edges of the screen with masking tape too.

Then it was the fun part of printing the design.


Here's the finished piece


 Now I think I need to do a table runner to match..

More creativity happening over here thanks to kootoyoo

Also linked up to a beach cottage